*Update* Here are the posts of my DIY folding tool and my DIY belt organization!
Last week I carved out some much needed time to clean out my closet. The change of seasons, my new interest in sewing, and the holidays had all contributed to new items in my closet. I temporarily housed them in a plastic bin stuck in my closet, but it blocked access so it was time for a minor clean out and folding!
One thing to mention is that I have very little lighting in my closet, so hopefully things show up okay. Also, this is what my closet looks like 90+% of the time. No styling here, just showing how I actually keep my closet, and a few tips for organizing!

First of all, I have a bureau of drawers where I keep my smaller folded T-shirts, blouses, cardigans, and workout items.
 |
| Folded shirts! |
 |
| Sweaters & cardigans |
I have a handy-dandy homemade tool that I use in order to fold my clothing right size. That way, folding is much easier and more uniform!
Now for my closet!
I have the luxury of a small walk-in closet, and I love it! I can't store my off-season items anywhere else, so my entire wardrobe has to live here. Hanging items on the left, shelving directly in front, and a pegboard on the right wall. On top of everything is a small space where I store shoes & boots. I'll skip the hanging items because there is nothing special there: I just organize by style and keep all of my hangers the same.
Here is my wall of shelving!
 |
| 12 bins of clothes! |
I keep all of my items in office bins from IKEA, which was the most economical way to fit my space. Each bin is labeled appropriately. Most frequently worn items are below and off-season clothing is above. It's as easy as swapping the top shelves for the bottom!
 |
| A little bit off center, but you get the gist! |
I organize by color, to make things easier. Now you may wonder how it is possible to know which shirt is which in this tank top bin, but this bin holds only camisoles, etc. that are completely plain without embellishment, more for layering. My "real" tops are either hanging or in my bureau.

Sweaters work great in the bins! I like to make my labels sometimes a little bit specific, but at least I know what's in them!
 |
| Yes, there is a different bin for long sleeved thin sweaters that aren't plain! |
It works great for pants too!
 |
| A rainbow of pants. :) |
Under the shelves, I have a space for my most used shoes. The only way to squeeze all of them in there was to stack them sideways! I may have a bit of a problem... More casual towards the bottom, to flats, then short boots/kitten heels/wedges on top.

On the right wall, I have a pegboard with hats. I know there is a tag on the summery wide-brim hat there, but it was on sale recently and I will have something fun to wear in a few months!

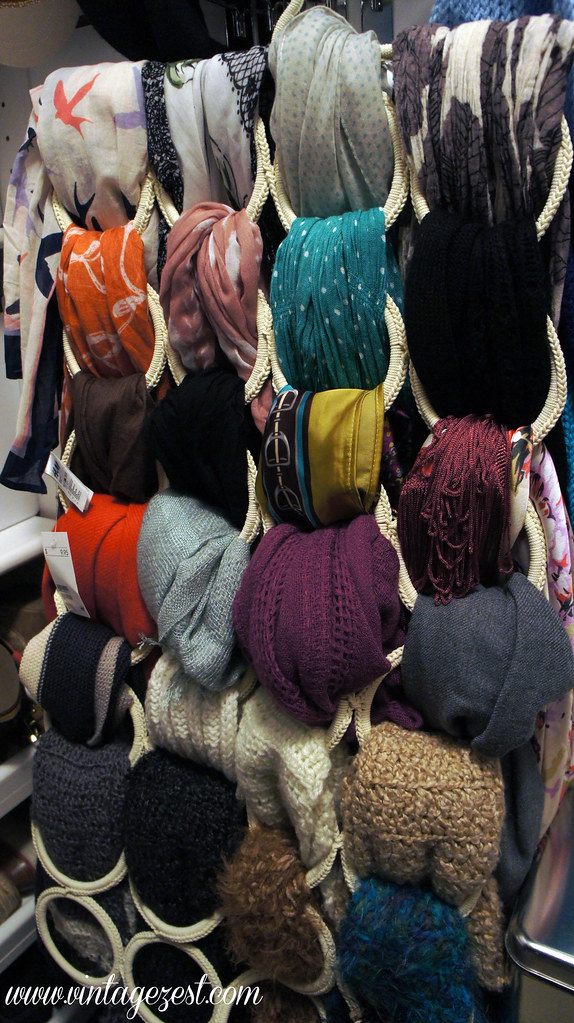
Under the hats, I have a scarf organizer (like this one) that I bought from IKEA yet again. I organized it by thickness with the lighter scarves on top. Nearly all of the scarves on the bottom two rows were knitted or crocheted by me!
On top of the whole shebang are my less worn shoes, meaning special occasion heels, rain boots, hiking boots, etc. My larger winter boots are towards the back as well.

It doesn't photograph well, especially with my tiny closet light, but it is actually easy to see the shoes inside their boxes. See below!


So that's how my closet looks for the most part, with some great storage solutions and my favorite DIY tool for laundry. The best part of my closet is being able to knowing what I have without a ton of visual clutter. Things are easy to find when I pull down the bin that I want, because items are "filed" away instead of stacked. Also, now that I see how many plain sweaters I have, I'm going to have to reconstruct some of them into something cuter perhaps... Stay tuned for my folding tool tutorial later!
This post contains affiliate links, meaning that if you make a purchase using one of the links, a small commission will go to support Vintage Zest. I will only recommend sites with products that I think you will love and enjoy!